


Showing posts with label Halloween. Show all posts
Showing posts with label Halloween. Show all posts
Sunday, October 9, 2011
Thursday, October 6, 2011
Wednesday, September 28, 2011

Sunday, October 17, 2010
Ensure a Bright Orange Halloween

Check out this awesome treasury curated by KCEtsy Team Member mamahootdesigns. It's full of great accessories sure to make for a playful Halloween weekend. I love the mix of everyday and holiday items ... individually and collectively they make for a whimsical Halloween collection from the team. Click on over to Etsy and let them, and mamahootdesigns, know your thoughts on this collection - everyone loves comments!
Tuesday, September 28, 2010

Thursday, October 22, 2009

Tuesday, October 20, 2009
Tuesday Tutorial:: Vintage Halloween Banner
 This weeks Tuesday Tutorial comes from Contessa Kris the talented mixed media artist behind Collage Contessa and Collage Curiosities. Kris loves using collage, paint, fabric, stamps, paper, metal, ephemera and anything else she can get her hands on to create one of a kind altered art. Her work has a lovely whimsical feel with a beautiful modern edge and often mixes in unique vintage images.
The tutorial Kris shares this week holds true to her style. Layers of different mediums are used to create this Vintage Halloween Banner. This design would translate beautifully for Thanksgiving, Christmas, Valentines, even July 4th! Have fun creating and drop us a line if you make something. We love show and tell!
Supplies:
3 pieces Orange 8 1/2 x 11" cardstock
9 Vintage Halloween postcards* or something similar, cut to 3 1/2 x 5" size
Background stamp (mine is like architecture iron work)
Black stazon ink pad
Embroidery floss (I used orange and dark brown)
Decorative Scissors (I used a 'Victorian' style)
5 ft Ribbon (mine has pumpkins on it)
Chipboard letters, stickers or rub-ons spelling HALLOWEEN
Glitter glue (I used clear)
Poker tool or use a bigger needle
Needle & Scissors
Glue & Exacto Knife

1. Take orange cardstock, fold and rip into 4 even pieces. Cut the 2 long sides with the decorative scissors. I cut off just enough to make the decorative edge but not enough to cut off width.
2. Using the background stamp, stamp with the black ink, onto the orange cardstock pieces. Ink the edges of the stamped pieces as well.
3. Cut out your postcards to a 3-1/2" x 5" size and glue vertically on the stamped cardstock. I put my glue about 1" in on each side of the postcard. Don't glue all the way to the edges. It makes the next step harder.
4. Take your poking tool or bigger needle and evenly spoke holes around the edge of the postcard (mine are almost 1/2" apart.)
5. Thread a larger needle with embroidery thread (I did not split mine, I used all 6 strands.) Stitch around the entire postcard. This is so simple, my 9 yr old dd was able to help me.
6. Using the exacto knife, cut about 1/2" down on the postcard section of your pieces, a 1/2" vertical slit on the left and right side. This will be so you can thread your ribbon through for your hanger.
7. Thread your ribbon through so the middle of the ribbon is behind the postcard. Make sure you have about 5+ inches extra on each end of your banner.
8. Adhere the chipboard (or sticker/rub-ons) to the bottom left corner of the postcards, spelling out Halloween.
9. Using the glitter glue, choose parts of your postcards to highlight with glitter.
10. Hang up wherever you desire!
 * If you don't have a stash of great grandma's postcards sitting in the attic you're willing to craft with, digital postcard images are available online. Kris found hers years ago in a Dover Publications e-mail newsletter. Lots of wonderful Etsy sellers offer inexpensive PDFs of vintage postcard images you can purchase and use in craft projects like this. Here are the listings for vintage Halloween postcards. Be best results, look for postcard images that are full size (3-1/2" x 5").
This tutorial was originally published on Kris' blog CollageContessa.blogspot.com and was reprinted with permission. Visit her blog to learn more about her work and for more great mixed media Halloween tutorials and projects.
* * * * *
Don't miss out on entering Week 10 of our Countdown to Christmas Great Blog Giveway from Thyme2dream! To enter read this post and follow the contest instructions.
Tuesday, October 13, 2009
We interrupt our regularly scheduled programing ...
to bring you some black and orange goodies ...


1. Dia de los Muertos Sparkle Cuff - Reversible Vinyl Bracelet (annebvinyl)
2. Perfection. Bracelet (LynspiredJewelry)
3. Boo It's Halloween, Standard Pillowcase (tinystitches)
4. Orange Birdie Earrings (creativeARTchicka)
2. Perfection. Bracelet (LynspiredJewelry)
3. Boo It's Halloween, Standard Pillowcase (tinystitches)
4. Orange Birdie Earrings (creativeARTchicka)
Wednesday, October 8, 2008
Halloween Garland Tutorial
Here's a whimsical Halloween craft you can make, with thanks going to TinyStitches for creating and sharing this project.
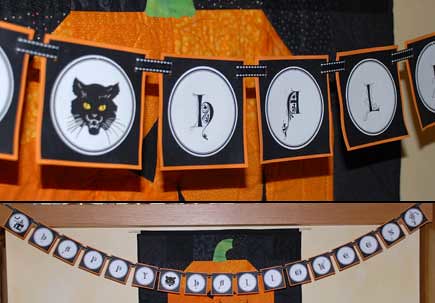 Here's what you need:
3 sheets of 8.5" x 11" white cardstock,
2 sheets of black 12" x 12" cardstock
2 sheets of festive orange 12" x 12' cardstock
scissors or large 3" circle punch
paper cutter or ruler and craft knife
gluestick or double sided tape
3/8" wide ribbon
Directions:
Print Happy Halloween circles on white cardstock. Cut each circle out using scissors or large 3" circle punch. Cut black cardstock into 3.5" squares. Cut orange cardstock into 3.75" squares.
Glue each circle on a square of black cardstock and then on a square of orange, centering the image each time.
Cut or punch small slits in the upper right and left corner of each square. Layout cards in the order, using any of the spacer graphics at the beginning, end and between both words. Weave ribbon through each slit, as pictured. If garland is too long, break it into two strands.
Here's what you need:3 sheets of 8.5" x 11" white cardstock,
2 sheets of black 12" x 12" cardstock
2 sheets of festive orange 12" x 12' cardstock
scissors or large 3" circle punch
paper cutter or ruler and craft knife
gluestick or double sided tape
3/8" wide ribbon
Directions:
Print Happy Halloween circles on white cardstock. Cut each circle out using scissors or large 3" circle punch. Cut black cardstock into 3.5" squares. Cut orange cardstock into 3.75" squares.
Glue each circle on a square of black cardstock and then on a square of orange, centering the image each time.
Cut or punch small slits in the upper right and left corner of each square. Layout cards in the order, using any of the spacer graphics at the beginning, end and between both words. Weave ribbon through each slit, as pictured. If garland is too long, break it into two strands.
Subscribe to:
Posts (Atom)