


 Here's what you need:
3 sheets of 8.5" x 11" white cardstock,
2 sheets of black 12" x 12" cardstock
2 sheets of festive orange 12" x 12' cardstock
scissors or large 3" circle punch
paper cutter or ruler and craft knife
gluestick or double sided tape
3/8" wide ribbon
Directions:
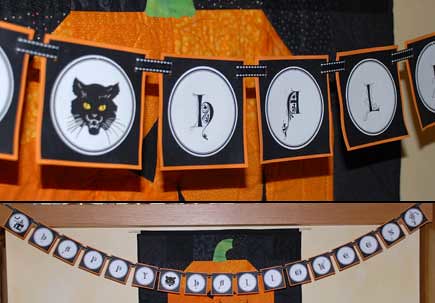
Print Happy Halloween circles on white cardstock. Cut each circle out using scissors or large 3" circle punch. Cut black cardstock into 3.5" squares. Cut orange cardstock into 3.75" squares.
Glue each circle on a square of black cardstock and then on a square of orange, centering the image each time.
Cut or punch small slits in the upper right and left corner of each square. Layout cards in the order, using any of the spacer graphics at the beginning, end and between both words. Weave ribbon through each slit, as pictured. If garland is too long, break it into two strands.
5 comments:
I just linked over to check out the garland project-great job! II'll be linkiing to this as well.
Love it! Thanks
Adorable Halloween craft. I will try to make my own. Thanks for the tutorial.
Post a Comment